Tuesday, October 27, 2009

Christmas Cardinal - SAS card #3

Here is Stamp-a-Stack card offering #3.  The cardinal is colored in with markers after being stamped in black Stazon ink on shimmery white cardstock.  I wouldn't normally have put black on a Christmas card, but it seemed like the best way to tie in the black on the bird, and in the end, I liked how it turned out!

Stamp the Old Olive layer using the branch silhouette stamp, add a little ribbon for some more festive cheer, and you're done!  To give the branches more dimension, just follow the hatching/shading lines that the stamp's artist already included, coloring them in with a darker shade of green than the rest of the branches/leaves.  The only other thing I might add is some Crystal Effects to the berries - since everything papercrafted can benefit from Crystal Effects!  :)

Saturday, October 24, 2009

Punch happy - SAS card two

This is the quickie card mentioned yesterday.  This card uses the set Christmas Punch.
It's so easy that there's not much to say about this card. :) A stamped background, and a main image stamped and punched, some ribbon and matting and it's done!

Thanks for stopping in!

Updated 10/28/09 with another look at this card in blue

What do you think?  Which do you like better?

Friday, October 23, 2009

Winter wonderland - SAS card one

I managed to put down the wool and do some stamping last night! This is the first card offering for my stamp-a-stack on November 7. 


This card uses the sets Winter Post and Teeny Tiny Wishes.  With coloring and glittering, this card is slightly more labor intensive, but with the use of punches for the sentiment (no worries about stamping it straight) and simple layers, it's still a pretty quick offering.  Tomorrow's card is simpler yet!


If you liked my felt offering, you can now see those on their own blog.  I think they're going to be frequent enough, and I wanted to keep them separate.  You can either click here, or use the Felting Through the Tulips button/icon in the menu on the right.

Saturday, October 10, 2009

I'll be back to stamping soon. Promise.

Last night I tried needlefelting! I bought a kit from Fancy Tiger last night on my way home from work, and after dinner, I whipped this little guy right up! The kit includes enough wool for two owls. The wings aren't even part of the original pattern, and I was able to fashion them pretty easily after making the rest of the bird. Not including the wings, he's about 1 3/4" across, with the wings, about 3".

Can't stop by the store? They have an etsy shop where you can buy kits like the one I used!
All you need is wool roving, a barbed needle and a foam block. Some repetitive stabbing/poking and it starts to "felt" the wool, making it essentially (I think) hold on to itself.
Seen below are some progressive photos of the process. Isn't he cute? I think I'll be making some more today. I'm going to stay inside since it's only 20 degrees so far and it's supposed to snow.

Wednesday, October 7, 2009

Birthday sleeve

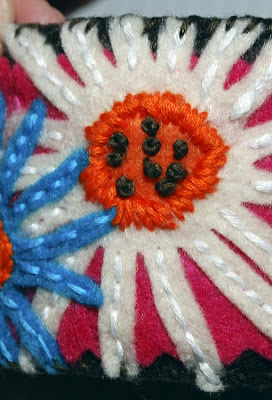
This is a reusable coffee cup cozie/sleeve that I made for my friend's birthday. It's made of felt and embroidered all the way around with a little monogram J stitched in just for fun.

She is a fan of coffee and she's the one who got me into stamping, so I feel a little weird not giving her something stamped. BUT, I'm very hopeful she'll appreciate the effort and friendship that I stitched into this project. And while this isn't a stamping projects, I used the Big Shot and Daisies die to cut the felt. It was so, so EASY. All the flowers came out beautifully! I can't imagine cutting out all those petals from felt. Although felt doesn't ravel, it can kind of fuzz/fray if you tug on the edges of a cut piece, too much.


Below are the shots of each of the flowers that I sewed on and their accompanying embroidery. I can totally see how I could incorporate this into a very special card, but if possible, this takes me longer than making a stamped project! However, you may get to see a few more projects like this, at least while football season is going on. I like watching football, but have trouble just sitting there watching, so this has been keeping my hands busy while I watch.


Some French knots ... aren't they cute? And easy, easy to do!


The little orange center is kind of "pooched" up in the middle; it feels especially nice to the touch. :)


A close up of the J. On this one, the orange circle behind it kind of flares up around the edges giving it even more dimension.


On this one I stitched across the circle/center and then layered French knots over the top.


More little French knot seeds in the flower center ...


And then, kind of a corset-looking closure to keep the girliness going. I also lined the inside of this cup holder with another piece of felt to cover up all my stitches. It ended up feeling very cozy and soft to the touch. Perfect for a hot beverage holder.


Tuesday, October 6, 2009

Birthday Rocker

This was my sister's birthday card this year. I used retired papers and the skull stamp from Just Jawin' to make an unusual card that made me smile and she seemed to like it too. :)

Nothing too tricky here. The sentiment was printed using my computer. I think the font is Rosewood.

The skull is kind of a metallic, transparent champagne (using shimmer paint) but because I didn't want the teeth to be that color, I masked them off before I painted over the skull.

Above you can see the mask stamped onto a large yellow sticky note with the plain white skull behind that. The crossed bones behind the skull were previously stamped onto brushed silver cardstock and cut out and adhered. Small note: you can see the big chunk of missing "forehead" from the stamp, and that's because it kept stamping a small smudge on my projects where there shouldn't be one.

Cut out the teeth from the stamped mask and layer them over the original. In this case the teeth are sticky-backed because I stamped that part of the image on top of the sticky from the paper (the sticky is on the back).


Sponge your shimmer paint or other color over the entire front, then just peel the mask away.

For my glitter eyes, I put down some Tombo mono-multi glue, filling in the eyes fully.

Dump the glitter on top, then tap off, returning excess to your container.


If extra sticks around the edges, just use your adhesive remover block, or even a clean pencil eraser.

As a final step, I put some Crystal Effects over the teeth just because I could. Hope you're having a good week! Tomorrow I'm going to post something totally different for me. But it's still a craft project. :)