Sunday, November 8, 2009
Blue Christmas
Posted by
Melissa K.
at
7:19 AM
0
comments
![]()
Tuesday, October 27, 2009
Christmas Cardinal - SAS card #3
Posted by
Melissa K.
at
6:58 AM
1 comments
![]()
Saturday, October 24, 2009
Punch happy - SAS card two
Posted by
Melissa K.
at
6:59 AM
0
comments
![]()
Friday, October 23, 2009
Winter wonderland - SAS card one
I managed to put down the wool and do some stamping last night! This is the first card offering for my stamp-a-stack on November 7.

Posted by
Melissa K.
at
6:58 AM
0
comments
![]()
Saturday, October 10, 2009
I'll be back to stamping soon. Promise.


Posted by
Melissa K.
at
7:46 AM
3
comments
![]()
Wednesday, October 7, 2009
Birthday sleeve
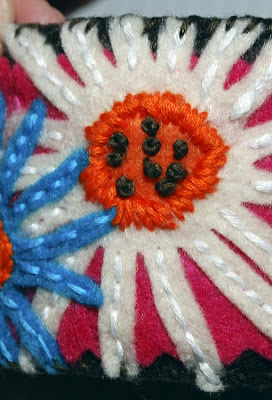
This is a reusable coffee cup cozie/sleeve that I made for my friend's birthday. It's made of felt and embroidered all the way around with a little monogram J stitched in just for fun.
She is a fan of coffee and she's the one who got me into stamping, so I feel a little weird not giving her something stamped. BUT, I'm very hopeful she'll appreciate the effort and friendship that I stitched into this project. And while this isn't a stamping projects, I used the Big Shot and Daisies die to cut the felt. It was so, so EASY. All the flowers came out beautifully! I can't imagine cutting out all those petals from felt. Although felt doesn't ravel, it can kind of fuzz/fray if you tug on the edges of a cut piece, too much.

Below are the shots of each of the flowers that I sewed on and their accompanying embroidery. I can totally see how I could incorporate this into a very special card, but if possible, this takes me longer than making a stamped project! However, you may get to see a few more projects like this, at least while football season is going on. I like watching football, but have trouble just sitting there watching, so this has been keeping my hands busy while I watch.

Some French knots ... aren't they cute? And easy, easy to do!

The little orange center is kind of "pooched" up in the middle; it feels especially nice to the touch. :)
Posted by
Melissa K.
at
6:16 AM
3
comments
![]()
Tuesday, October 6, 2009
Birthday Rocker
This was my sister's birthday card this year. I used retired papers and the skull stamp from Just Jawin' to make an unusual card that made me smile and she seemed to like it too. :)
Nothing too tricky here. The sentiment was printed using my computer. I think the font is Rosewood.
The skull is kind of a metallic, transparent champagne (using shimmer paint) but because I didn't want the teeth to be that color, I masked them off before I painted over the skull.
Above you can see the mask stamped onto a large yellow sticky note with the plain white skull behind that. The crossed bones behind the skull were previously stamped onto brushed silver cardstock and cut out and adhered. Small note: you can see the big chunk of missing "forehead" from the stamp, and that's because it kept stamping a small smudge on my projects where there shouldn't be one.
Cut out the teeth from the stamped mask and layer them over the original. In this case the teeth are sticky-backed because I stamped that part of the image on top of the sticky from the paper (the sticky is on the back).

Sponge your shimmer paint or other color over the entire front, then just peel the mask away.
Posted by
Melissa K.
at
6:50 AM
1 comments
![]()
Wednesday, September 30, 2009
Birthday boy's card
This is the card for my mom's husband's birthday. I was in need of a masculine card and could NOT think of what to do, so I went blog browsing.

Posted by
Melissa K.
at
8:25 PM
0
comments
![]()
Tuesday, September 29, 2009
New Stampin' Up! Clearance Rack
Shop early and often at the new Stampin' Up clearance rack! They're offering retired inventory at reduced prices, but only while supplies last. Today I saw that they had designer series paper, and ribbon and rub-ons at GREAT prices.
Posted by
Melissa K.
at
9:16 PM
0
comments
![]()
Monday, September 28, 2009
Fresh Fall Flowers
OK! Here's the final stamp camp card. I really like this one, a lot. There are lots of little elements to this card that I think make this card special. Brads, ribbons, striped paper, scallop punching, corner punch elements ... whew! But for all that, this is a very quick card. :)
Posted by
Melissa K.
at
9:21 PM
1 comments
![]()
Sunday, September 27, 2009
Fall is almost here
I'm sorry the photo on this isn't the best, I'm just trying to get it out there before I head to bed tonight. :)
I think this is one of the cards that we're making for stamp camp this weekend. One more to design! You like my preplanning skills? Ha! I usually know which sets I want to use, and what the theme is, but don't have the final design in mind.
This card uses the set Season of Friendship and Tall Tales designer paper. The bird and ribbon are in the color Dusty Durango, and the other colors are chocolate chip, old olive and so saffron.
You may be reading this on a Monday and I hope if that's the case that your Monday is going great. Have a good week and stop by later for some more cards, including the last stamp camp card. Thanks!
Posted by
Melissa K.
at
9:37 PM
0
comments
![]()
Thursday, September 24, 2009
No stamping tonight
downtown Denver, just a few blocks from work. We're just 16 rows up in
my company's seats. They got turned in late when they couldn't be used
with clients, and since I was working late, I got to take them! Go
Rockies!! :)
Posted by
Melissa K.
at
8:04 PM
0
comments
![]()
Cupcake card
I think this is one of the cards we'll make at next week's stamp camp. Seriously, I really could use someone to tell me the truth, though! Is this card cute enough for others to make, or am I just fooling myself? I messed with it and messed with it and had the hardest time making it look good to me.
But once I figured out what I was doing, it wasn't a hard card to make.
This card uses two stamp sets, Crazy for Cupcakes and Everything Nice. The patterned paper is Razzleberry Lemonade, with Rich Razzleberry, Melon Mambo and Whisper White cardstock. The orange glitter is from the Fine Supernova set. It's very sparkly!
The cupcake stand is colored in Razzleberry, the frosting is So Saffron and the cherries are in Melon Mambo and topped with Crystal Effects for shine. I love that the In Colors are available in markers now! Finally, I watercolored in the cupcake wrappers with Soft Suede so that I could dilute the color a little bit.
The two main image pieces also have lines drawn in around the edges using Melon Mambo and Pumpkin Pie markers. Because the designer paper has sort of a doodle feel about it, I thought I could get away with that as a way to fill up space when I had too much white space still showing after the card was assembled. I think it's a casual way to bring in more color and vibrancy! :)
Posted by
Melissa K.
at
6:16 AM
2
comments
![]()
Tuesday, September 22, 2009
Frankenstein Treat Bucket
My project should have been up yesterday, but apparently, the end project that I had in mind, wasn't where the project wanted to go ... Instead, a little Frankenstein decided to come out, just a little later than anticipated!
It's kind of funny, but I had a hard time taking a picture of this project. I really do think it's cuter in person, by quite a lot! His eyes are done using a 1" circle and 1/2" circle project. His eyes and nose are punched out using the Modern Label Punch. The mouth was just doodled in with a permanent marker.
My original project that I started with used the Just Jawing set and this little bucket from the Target Dollar Spot. As you can see, there's no part of Just Jawing in here. :) I finished the feature piece with that set, but I'll have to post that later. I may be a little absent this week as I have a busy week at my day job.
Posted by
Melissa K.
at
9:08 PM
0
comments
![]()
Sunday, September 20, 2009
Entering the teen years
Today's card is for our friend's son. He's entering the teen years on Monday. He's a great kid and I wanted to be able to give him a special card. As a new teen it doesn't seem like he'd appreciate a "kiddie" card, and I don't have a lot of teen-friendly stamps, so I opened Photoshop and made an image with the number 13 and then I flipped it before printing it on some brushed silver cardstock. I flipped it so that it could be cut out and still face correctly.
When I inserted my brads, they were too smooth and shiny so I took out a cotton swab and dipped it in the Platinum shimmer paint. I daubed it on the brads and let it dry - I think it gave it a nice, almost hammered finish.
Posted by
Melissa K.
at
6:26 AM
1 comments
![]()
Saturday, September 19, 2009
Happy anniversary!
Today is my wedding anniversary. This is the card that I'm giving to my husband. Marriage is work, but it's the most fun work I've ever done. We'll probably go out to dinner ... or something. :) We don't worry about the celebration aspect too much because we feel like we have such a good life together anyway that we just enjoy anything we do to celebrate as a special time to spend together.
Posted by
Melissa K.
at
6:19 AM
4
comments
![]()


